For many, the sight of a lush, blooming orchid is a true delight. Yet, all too often, these elegant flowers fade away after their initial burst of color, leaving behind a bare, green plant that can feel like a disappointment. But what if there was a simple kitchen trick that could keep your orchids flourishing for months on end?
Believe it or not, the key to reviving those tired-looking orchids may be lurking in your pantry. With a few strategic applications of a common household ingredient, you can coax your orchids back into full bloom, extending their vibrant display for weeks or even months beyond their typical lifespan.
The Surprising Secret: Molasses as a Natural Orchid Booster
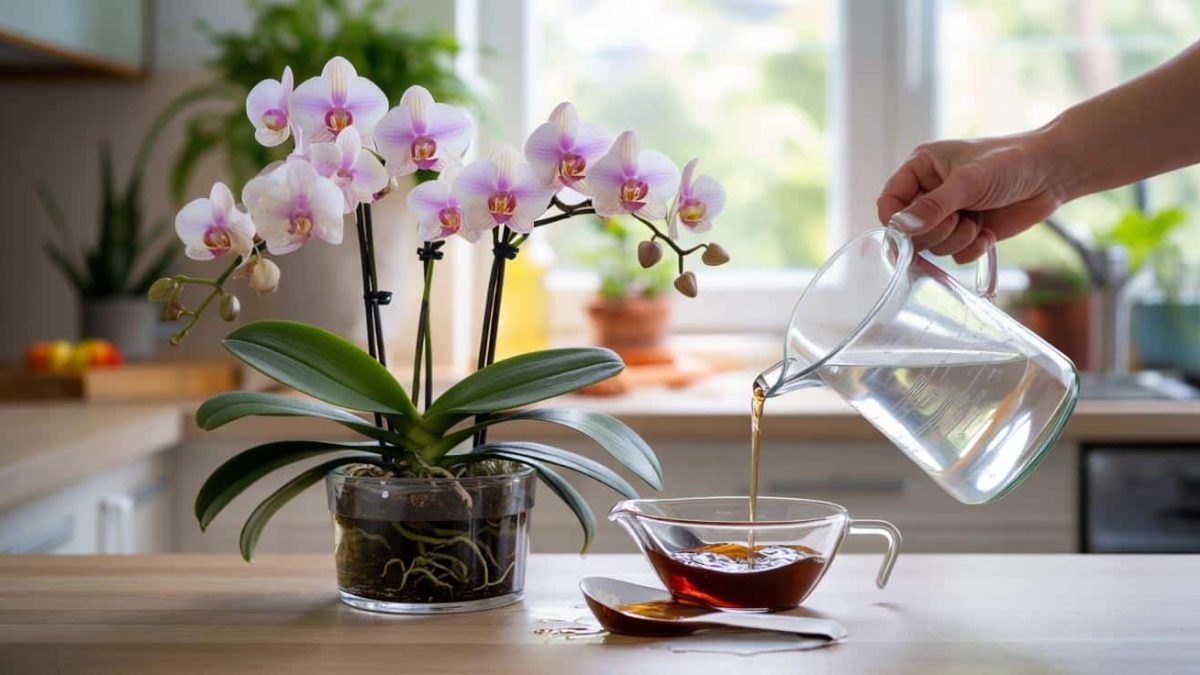
The secret ingredient is molasses, a byproduct of sugar refining that’s often overlooked in the kitchen. But when used judiciously, this syrupy substance can work wonders for your orchids, providing a gentle, natural boost to their flowering cycle.
Unlike harsh chemical fertilizers, molasses offers a more gradual, gentle nourishment that mimics the orchid’s natural feeding process. By diluting a small amount of molasses in water and giving your orchids a monthly “drink,” you can stimulate new bud growth and extend the life of those stunning blooms.
- ➡Meteorit im Vorgarten: So viel sind Brocken wert und wer für Schäden zahlt
- ➡Buffalo Grill: Der wahre Grund für die Gratis-Salat-Schüssel
- ➡Lavendelfeuerwerk im Juli: Mit diesen 3 Hausmitteln blüht dein Strauch explodierend schön
- ➡Mit einem Fund vom Flohmarkt: So bekommt dein Garten nostalgischen Altbau-Charme
The key is to strike the right balance – too much molasses can overwhelm the plant, while too little won’t provide the necessary nutrients. But with a little trial and error, you’ll soon find the perfect molasses mixture to keep your orchids thriving.
Molasses Magic: A Step-by-Step Guide
Transforming your orchids into long-lasting floral displays is easier than you might think. Here’s a step-by-step guide to the molasses trick:
- Mix the Molasses Solution: Combine 1 tablespoon of unsulfured molasses with 1 cup of lukewarm water. Stir well until the molasses is fully dissolved.
- Apply the Mixture: Once a month, pour the molasses solution directly onto the soil around the base of your orchid. Avoid getting the mixture on the leaves or flowers.
- Water as Usual: Continue your regular watering routine, but be sure to water the orchid with plain water a day or two after the molasses application.
- Monitor and Adjust: Keep an eye on your orchid’s progress, and adjust the molasses ratio or application frequency as needed to maintain optimal growth and blooming.
The Science Behind the Molasses Magic
So, what makes molasses such a powerful elixir for orchids? The secret lies in its unique nutrient profile. Molasses is rich in essential minerals like iron, calcium, and magnesium, which orchids need to thrive. It also contains trace elements like boron and manganese, which can be difficult to source from traditional orchid fertilizers.
Perhaps most importantly, molasses is a natural source of carbohydrates, providing a slow-release energy boost that helps fuel the orchid’s growth and flowering. This gradual nourishment mimics the way orchids would receive nutrients in their natural tropical habitats, where they draw sustenance from decomposing organic matter.
By delivering this balanced, organic blend of nutrients, the molasses solution helps to keep your orchids happy, healthy, and continuously blooming. It’s a simple but effective way to give these finicky flowers the care they crave.
Timing is Everything: When to Apply the Molasses Magic
Knowing when to apply the molasses solution is just as important as the mixture itself. The best time to give your orchids a molasses boost is typically right after they’ve finished blooming, when the plant is transitioning into a new growth cycle.
This timing allows the orchid to direct its energy towards producing new buds and flowers, rather than focusing solely on maintaining its existing blooms. By giving the plant a gentle nutrient boost at this critical juncture, you can encourage a longer, more vibrant flowering period.
Of course, every orchid is unique, so you may need to experiment a bit to find the optimal application schedule for your particular plants. Some may respond better to a monthly molasses feeding, while others may thrive with a less frequent regimen. The key is to pay close attention to your orchids’ cues and adjust your approach accordingly.
- ➡So werden fest verklebte Innensohlen wieder hygienisch sauber
- ➡Großer Waschmittel Check zeigt, welche flüssige Marke selbst hartnäckige Flecken am besten entfernt
- ➡Genialer Nähtrick: In 15 Minuten ein Brillenetui aus einer alten Hemdmanschette
- ➡Ein Trick mit einer Tasse im Geschirrspüler senkt sofort Ihre Stromkosten
Beyond Molasses: Other Orchid-Friendly Ingredients
While molasses is the star of the show, it’s not the only kitchen ingredient that can work wonders for your orchids. In fact, there are a few other common household items that can provide additional benefits to these finicky flowers.
For example, a diluted solution of coffee grounds can help to acidify the soil and provide a boost of nitrogen, which orchids love. Banana peels, when buried around the plant’s base, can also contribute essential nutrients like potassium and phosphorus. And a light misting of milk or egg whites can help to strengthen the orchid’s leaves and stems.
Of course, as with the molasses, it’s important to use these ingredients in moderation and with caution. Overdoing it can cause more harm than good. But when applied judiciously, these kitchen-cabinet solutions can be a powerful complement to the molasses trick, helping to keep your orchids at the peak of health and beauty.
Orchid Care Beyond the Molasses: The Basics Matter
While the molasses magic is a game-changer for reviving tired orchids, it’s important not to neglect the fundamental elements of orchid care. Things like proper lighting, temperature, and watering still play a crucial role in the plant’s overall well-being.
Orchids thrive in bright, indirect light, with ideal temperatures ranging from 65-85°F. They also prefer a well-draining potting mix and should be watered only when the soil has partially dried out. Paying attention to these basic needs, in addition to the molasses boost, will help ensure your orchids remain healthy and vibrant for the long haul.
With the right balance of care and nourishment, your orchids can become a source of lasting beauty and joy in your home. So why not give the molasses trick a try and see how it transforms your orchid collection? You just might be amazed at the results.
Potential Risks and Limitations of the Molasses Method
While the molasses trick can be a game-changer for many orchid owners, it’s important to be mindful of potential risks and limitations. Overusing the molasses solution, for example, can lead to issues like root rot or fungal growth. Similarly, applying the mixture too frequently or in too high a concentration can overwhelm the plant and cause more harm than good.
It’s also worth noting that the molasses method may not work equally well for all orchid varieties. Some species may be more sensitive to the changes in soil pH or nutrient balance, and may respond better to traditional orchid fertilizers or other care strategies.
- ➡Sport am Abend: Wann er gut tut – und wann er den Schlaf raubt
- ➡Genialer Trick vom Floristen: So vertreiben Sie Trauermücken mit Streichhölzern
- ➡Sommerzeit-Umstellung: Mit diesen Arzt-Tipps kommen Sie gut durch die verlorene Stunde
- ➡Karrierekiller Multitasking: Warum ständiges „Ja sagen“ Ihren Aufstieg stoppt
As with any plant care regimen, the key is to pay close attention to your orchids’ individual needs and adjust your approach accordingly. Start with a conservative molasses application, monitor the results closely, and be prepared to tweak the frequency or concentration as needed. With a bit of trial and error, you’ll soon find the sweet spot that keeps your orchids thriving.
The Molasses Trick in Practice: Real-World Success Stories
Still not convinced that the molasses method can work wonders for your orchids? Just ask some of the passionate gardeners who have already discovered the transformative power of this kitchen staple.
“I was ready to give up on my orchids until I tried the molasses trick. Now, my plants are blooming more vigorously than ever, and the flowers last for months on end. It’s a game-changer!”
– Sarah, avid orchid enthusiast
“As a professional florist, I’ve tried every orchid fertilizer and care routine under the sun. But the molasses solution is by far the most effective and natural way to keep these finicky flowers happy and healthy. My clients love the long-lasting results!”
– Michael, floral designer
“I was skeptical at first, but the molasses trick has completely transformed my orchid collection. The plants look lush, the blooms are vibrant, and I no longer have to worry about them fading away after a few weeks. It’s a game-changer!”
– Alex, urban gardener
Also Read
- ➡Warum ein kurzer Spaziergang im Grünen laut Psychologen Stress schneller abbauen kann als ein intensives Workout im Fitnessstudio
- ➡Oster-Schoko-Trick: An diesem Datum zahlen Sie im Supermarkt nur die Hälfte
- ➡So zwingen Sie Ihren Nachbarn legal, die Hecke zu schneiden
- ➡Geniale Ofen-Idee: So werden zerkratzte Schallplatten in 5 Minuten zur Dekoschale
With testimonials like these, it’s clear that the molasses method is not just a passing fad, but a proven and practical way to breathe new life into your orchids. So why not give it a try and see the magic for yourself?
How much molasses should I use for my orchids?
The recommended ratio is 1 tablespoon of molasses per 1 cup of lukewarm water. This diluted solution can be applied monthly to the soil around the base of your orchid plant.
How often should I apply the molasses solution?
Most orchid experts recommend applying the molasses mixture once a month, typically right after the plant has finished blooming. This timing helps to support the orchid’s natural growth cycle and encourage a longer flowering period.
Can I use any type of molasses?
For best results, use an unsulfured, organic molasses. Avoid using blackstrap molasses, as it can be too strong for orchids. Opt for a lighter, more mild-flavored molasses variety instead.
- ➡1‑Euro-Badewunder: Mit diesem Salz wird dein Rasen vor dem Sommer wieder sattgrün
- ➡Renault plant E-Autos mit 1.400 km Reichweite und 10-Minuten-Ladung
- ➡Griechischer Vornamen-Geheimtipp: Dieser Klang steht für pure Eleganz
- ➡Zwei verblüffende Fähigkeiten: Daran erkennst du wirklich kluge Menschen im Job
How long will it take to see results from the molasses treatment?
The timeline can vary depending on the orchid variety and its overall health, but most gardeners report seeing noticeable improvements in bud and flower development within 2-3 months of consistent molasses applications.
Can I use the molasses trick on all types of orchids?
While the molasses method works well for many common orchid species, like phalaenopsis and dendrobium, it may not be suitable for all varieties. Some more delicate or specialized orchids may require a different care regimen. It’s always best to research the specific needs of your orchid type.
What other kitchen ingredients can I use to support my orchids?
In addition to molasses, other kitchen staples like coffee grounds, banana peels, and diluted milk or egg whites can provide beneficial nutrients and support for orchids. Just be sure to use these ingredients sparingly and monitor your plants closely.
How do I know if I’m overfeeding my orchids with molasses?
Signs of molasses overfeeding can include wilting, discoloration, or fungal growth on the plant. If you notice any of these issues, reduce the frequency or concentration of the molasses solution and monitor the orchid’s recovery.
Can the molasses trick revive an orchid that’s already died back?
In some cases, the molasses solution may be able to kickstart new growth on an orchid that has lost all of its flowers and foliage. However, if the plant is truly dead or severely damaged, it may be best to start fresh with a new orchid specimen.