For many homeowners, the thought of tackling electrical work can be daunting, especially when it comes to replacing a ceiling light fixture. The process may seem intimidating, but with the right guidance, it can be a straightforward and rewarding task. By learning how to safely and efficiently swap out an old ceiling light, you can not only save money but also enjoy the satisfaction of a job well done.
In this article, we’ll walk you through the steps to replace a ceiling light fixture in just 15 minutes, ensuring a smooth and worry-free experience. Whether your current light is outdated, malfunctioning, or simply not providing the desired illumination, you’ll be surprised at how simple the process can be.
Preparing for the Light Fixture Swap
Before you begin, it’s crucial to take the necessary safety precautions. Shutting off the power to the light fixture at the circuit breaker is the first and most important step. This will prevent any risk of electrical shock, ensuring a safe working environment. Once the power is off, you can proceed with the replacement process without worry.
Gathering the right tools and materials is also key to a successful light fixture swap. You’ll need a screwdriver, wire stripper, and a replacement light fixture that matches the size and electrical requirements of your existing one. It’s also a good idea to have a ladder or step stool on hand to reach the ceiling comfortably.
- ➡Nachtwach zwischen 2 und 4 Uhr? Dieses Stresshormon steckt dahinter
- ➡Chanel-Show in Paris: Inès de la Fressange macht die weiße Hose wieder begehrlich
- ➡Adieu fettige Haare: Das Geheimnis für eine dauerhaft frische und leichte Mähne
- ➡Neues Intim-Gadget saugt Sperma sanft ab – soll Sexkomfort für Frauen verändern
With the safety checklist and necessary supplies in place, you’re ready to begin the light fixture replacement process.
Removing the Old Ceiling Light Fixture
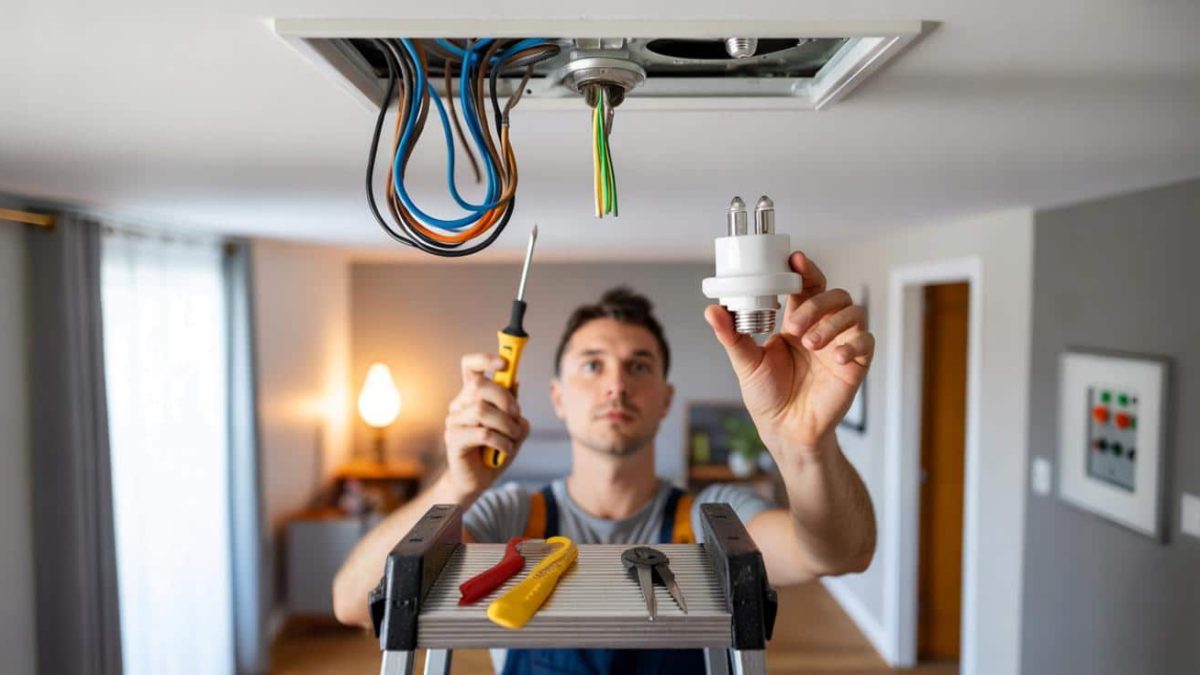
Carefully remove the old light fixture by unscrewing the mounting screws that secure it to the electrical box in the ceiling. Take note of how the wires are connected, as you’ll need to replicate this setup when installing the new fixture.
Gently disconnect the wires, making sure to keep them organized and accessible. Be mindful of any fragile components or delicate glass shades that may require extra care during the removal process.
Once the old fixture is detached, you can set it aside and prepare the ceiling for the new installation.
- ➡Zyklon Narelle rast auf Australien zu: Böen bis 260 km/h erwartet
- ➡Letzte Minuten mit Hund oder Katze: Diese Worte trösten – und einen Satz sollten Sie vermeiden
- ➡Neue Studie zu Hausgeburten: So sicher sind sie wirklich im Vergleich zur Klinik
- ➡Uralter Mars-Stein verrät: In diesem schwarzen Brocken steckt altes Wasser
Installing the New Ceiling Light Fixture
With the old fixture removed, you can now focus on attaching the new one. Begin by securely mounting the electrical box or mounting bracket to the ceiling, ensuring it is firmly in place. This will provide a stable foundation for the light fixture.
Next, connect the wires according to their corresponding colors: the black wire to the black (or hot) wire, the white wire to the white (or neutral) wire, and the green or bare copper wire to the ground. Double-check your work to ensure a proper and safe connection.
Finally, attach the light fixture to the mounting bracket or electrical box, securing it in place with the provided screws. Take care to align the fixture properly and tighten the connections snugly.
Restoring Power and Testing the New Light
With the new light fixture installed, it’s time to restore power to the circuit. Flip the circuit breaker back on, and observe the light fixture. If all the connections are correct, the new light should illuminate immediately.
- ➡Sie zweifeln an seiner Liebe? 7 klare Zeichen, dass es ernst ist
- ➡Mit 72 Jahren Radfahren auf flachen Strecken: Wie moderate Bewegung die Fitness unterstützt
- ➡Dieses Frühblüher-Geheimnis lockte endlich wieder Igel in den Garten
- ➡Geniale No-Sew-Methode: So wird dein altes Kleid in 15 Minuten zur Trend-Rock
Take a moment to admire your handiwork and ensure the light is functioning as expected. Adjust the fixture’s positioning or tighten any loose connections if necessary.
Congratulations! You have successfully replaced a ceiling light fixture in just 15 minutes, and you can now enjoy the benefits of a brighter, more updated space.
Understanding Electrical Terminology
As you delve into the world of electrical work, it’s helpful to familiarize yourself with some basic terminology. The “phase” wire is the live, or hot, wire that carries the electrical current. The “neutral” wire completes the circuit, returning the current to the power source. The “ground” wire, on the other hand, provides a safety path for any stray electrical current, preventing potential shocks or fires.
Knowing these distinctions will not only help you understand the wiring process but also ensure you make the correct connections for a safe and functional light fixture installation.
Practical Advice for a Successful Light Swap
While the process of replacing a ceiling light fixture may seem straightforward, there are a few additional tips that can help ensure a smooth and successful project:
- Take a photograph of the existing wiring setup before disconnecting the old fixture. This will serve as a helpful reference when connecting the new one.
- If you encounter any unusual or unfamiliar wiring, it’s best to consult a licensed electrician for guidance. Safety should always be the top priority.
- Consider upgrading to a more energy-efficient LED light fixture, which can help you save on your energy bills in the long run.
- If the new fixture is heavier than the old one, make sure the electrical box in the ceiling can safely support the additional weight.
By following these practical tips and the step-by-step instructions outlined in this article, you can confidently tackle the task of replacing a ceiling light fixture and enjoy the benefits of a brighter, more modern space.
Frequently Asked Questions
How long does it really take to replace a ceiling light fixture?
With the right preparation and tools, the actual replacement process can be completed in as little as 15 minutes. However, the total time required may vary depending on the complexity of the existing wiring and the specific light fixture you are installing.
Can I replace a ceiling light fixture myself, or should I hire an electrician?
For most standard ceiling light fixture replacements, it is generally safe for a homeowner with basic DIY skills to tackle the project themselves. However, if you have any concerns or encounter complex wiring, it’s always best to consult a licensed electrician to ensure the work is done safely and up to code.
What tools do I need to replace a ceiling light fixture?
The essential tools for replacing a ceiling light fixture include a screwdriver, wire stripper, and a ladder or step stool to access the electrical box in the ceiling. You may also find a voltage tester helpful to ensure the power is turned off before you begin work.
How do I know if the new light fixture will fit properly?
Before purchasing a replacement light fixture, measure the dimensions of your existing electrical box and the space around it. Make sure the new fixture will fit securely and that the mounting bracket or hardware is compatible with your ceiling setup.
What if the wires in my ceiling don’t match the colors of the new light fixture?
If the wire colors don’t match, don’t worry. The key is to connect the wires by function, not color. Match the black (hot) wire to the black wire, the white (neutral) wire to the white wire, and the green or bare copper (ground) wire to the ground wire on the new fixture.
How can I ensure the new light fixture is installed safely and securely?
Always make sure to turn off the power at the circuit breaker before starting any electrical work. Double-check your connections, and ensure the mounting hardware is properly secured to the electrical box. If you have any doubts or concerns, it’s best to consult a professional electrician.
- ➡1‑Euro-Badewunder: Mit diesem Salz wird dein Rasen vor dem Sommer wieder sattgrün
- ➡Diese Methode hilft, CO?-Ausstoß zu senken, indem du Transportwege kürzt
- ➡Diese einfache Balkonblume lockt massenhaft Bienen an – fast ohne Pflege
- ➡Glücklich im Ruhestand: 7 einfache Alltagsentscheidungen mit großer Wirkung
Can I upgrade to a more energy-efficient LED light fixture?
Absolutely! Swapping out an old incandescent or fluorescent light for an LED fixture is a great way to improve energy efficiency and reduce your electricity costs. Just make sure the new LED fixture is compatible with your existing electrical setup and can safely replace the previous light.
What should I do if the new light fixture doesn’t turn on after installation?
If the new light fixture doesn’t illuminate after you’ve restored power, first check that all the wiring connections are secure and properly matched. Verify that the circuit breaker is turned on and that the fixture is receiving power. If the issue persists, you may need to consult an electrician to troubleshoot the problem.