As the sun warms the earth and the days grow longer, gardeners across the country eagerly await the arrival of the perfect planting season. For many, the humble potato stands as a cornerstone of their homegrown bounty, promising a bountiful harvest that can rival even the most well-stocked supermarket. But when it comes to the optimal time to set those precious tubers in the ground, the answers can be as varied as the gardeners themselves.
Whether you swear by the advice of your green-thumbed neighbor, the phases of the moon, or the time-tested wisdom of your grandmother’s garden journal, one thing is clear: the secret to a record-breaking potato harvest lies not in a single, perfect planting date, but in a delicate dance with the rhythms of the soil and the cycles of the seasons.
Preparing the Soil for Potato Planting
The key to a bountiful potato harvest starts long before the first seed spud hits the ground. Well-tilled, nutrient-rich soil is the foundation upon which your potato dreams will be built. Begin by turning over the planting area, breaking up any clumps or compacted earth to create a loose, airy texture that will allow the roots to spread and the tubers to swell.
Incorporate generous helpings of compost or well-rotted manure, ensuring that the soil is brimming with the organic matter that potatoes crave. This not only provides essential nutrients but also helps to retain moisture and improve drainage – two critical factors in the quest for a record-breaking harvest.
With the groundwork laid, it’s time to turn your attention to the seed potatoes themselves. Choose certified disease-free varieties suited to your local climate, and consider pre-sprouting them a few weeks before planting to give them a head start on the growing season.
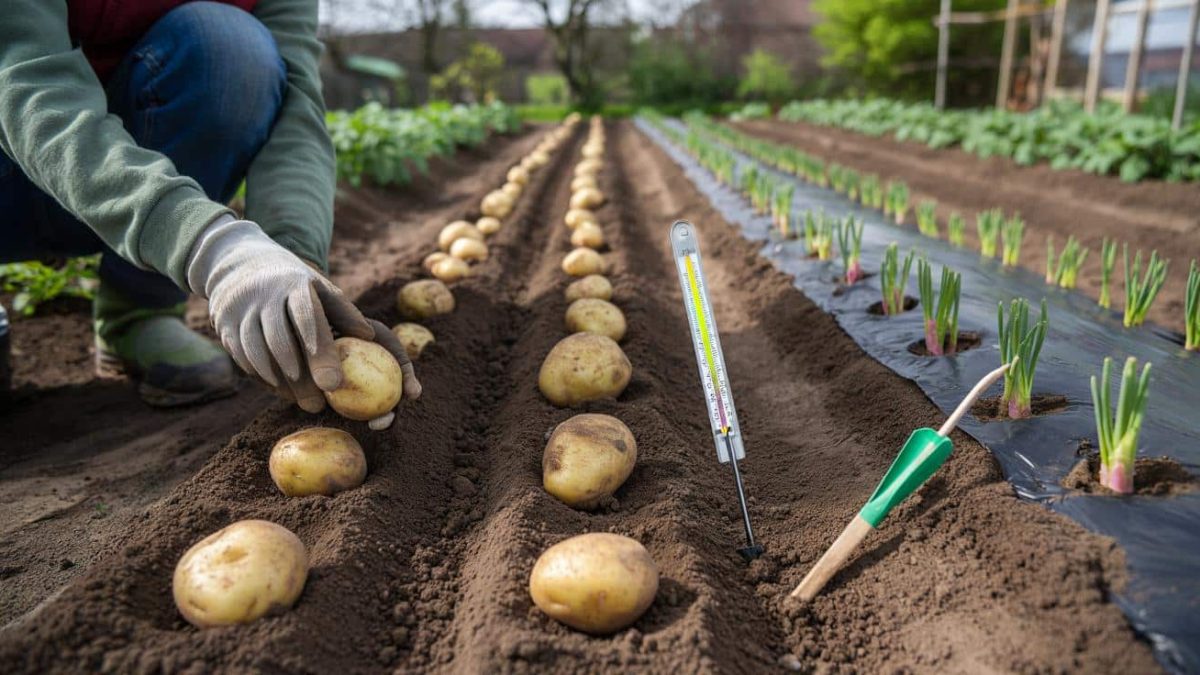
Timing is Everything: When to Plant Potatoes
Forget about rigid planting schedules or listening to the neighbors – the true secret to perfect potato timing lies in the soil itself. Wait until the earth has warmed to around 10°C (50°F) before placing those precious seed tubers in the ground, as potatoes thrive in cool, moist conditions but will rot in cold, wet soil.
Pay close attention to the weather forecast, aiming to plant during a dry spell that will allow the soil to absorb the nutrients and settle around the new plants. And don’t be afraid to experiment a little – try successive plantings a week or two apart to see which timing works best for your unique growing conditions.
As the plants emerge and begin to grow, it’s time to take the next crucial step: hilling, or building up the soil around the stems. This not only protects the developing tubers from sunlight (which can turn them green and bitter) but also encourages the formation of additional underground stems, each one bearing its own crop of potatoes.
- ➡Letzte-Chance-Trick im Kühlschrank: Darf man Essen kurz vor Ablauf einfrieren?
- ➡Neues Intim-Gadget saugt Sperma sanft ab – soll Sexkomfort für Frauen verändern
- ➡Warum frühe Schulanfänge unseren Kindern massiv schaden können
- ➡Diese unterschätzte Fähigkeit verrät überdurchschnittliche emotionale Intelligenz
Maximizing Yield with Mulch and Cover Crops
Once your potato plants are established, it’s time to pull out all the stops in pursuit of that record-breaking harvest. Mulching the soil with a thick layer of straw, hay, or shredded leaves can work wonders, helping to retain moisture, suppress weeds, and keep the soil cool – all vital factors in coaxing the maximum number of potatoes from each plant.
For an extra boost, consider sowing a cover crop between the rows, such as clover or buckwheat. These hardy plants not only improve soil fertility but also attract beneficial insects that can help to ward off pests and diseases. Plus, when it’s time to harvest, you can simply turn the cover crop into the soil, providing an additional dose of organic matter to nourish your plants for the next season.
With the right preparation, timing, and a few clever tricks up your sleeve, the path to potato-growing glory is well within your reach. So get out there, get your hands dirty, and discover the joys of homegrown spuds that far surpass anything you’ll find in the supermarket.
Avoiding Common Potato-Growing Pitfalls
Even the most experienced gardeners can sometimes fall victim to the common pitfalls of potato cultivation. One of the most crucial mistakes to avoid is planting too early, when the soil is still cold and damp. This can lead to rotting tubers, stunted growth, and a disappointing harvest.
- ➡Ist das Livret A am Ende? Diese Konten kann der französische Staat für den Verteidigungsfonds nutzen
- ➡Dünne Augenbrauen? Mit diesen 4 Beauty-Tricks wirken sie schnell voller
- ➡Zwei duftende Gartenpflanzen, die Ameisen zuverlässig fernhalten
- ➡Frühjahrsputz leicht gemacht: Diese 6 Action-Produkte räumen dein Zuhause auf
Another common error is neglecting to hill up the soil around the plants as they grow. Forgetting this crucial step can expose the developing tubers to sunlight, causing them to turn green and develop a bitter, toxic taste. And be sure to keep a watchful eye for pests and diseases, quickly addressing any issues before they can take hold and ravage your crop.
Finally, don’t be tempted to skimp on the mulch or cover crops. These vital additions not only nourish the soil but also help to retain moisture and suppress weeds – all essential factors in coaxing the maximum yield from your potato patch.
Harvesting and Storing Your Homegrown Potatoes
As the days grow shorter and the first autumn chill fills the air, it’s time to reap the rewards of your potato-growing labors. Dig carefully around the base of each plant, taking care not to damage the tubers, and gently lift the entire plant from the soil. Brush off any excess dirt, but avoid washing the potatoes, as this can promote premature sprouting.
Sort your harvest, separating the largest, most unblemished specimens for immediate use, and set aside the smaller, irregularly shaped ones for storage. Cure the potatoes in a cool, dry place for 10-14 days, allowing the skins to thicken and any minor nicks or cuts to heal over.
- ➡Fataler Pflanzfehler: Deshalb blüht Ihr junger Obstbaum einfach nicht
- ➡Darum warnt die Regierung: Warum heißes Leitungswasser Ihren Kaffee ruinieren kann
- ➡Das Hausmittel, das hartnäckige Rotweinflecken auf dem Sofa wirklich entfernt
- ➡Die perfekte Business-Uhr: So passt sie wirklich zu Ihrem Büro-Outfit
Once cured, your homegrown potatoes can be stored in a dark, cool location – such as a root cellar or basement – for up to 6 months. Be sure to check them regularly, removing any that show signs of sprouting or rot, and you’ll be able to enjoy the fruits of your labor well into the winter months.
Potatoes in Pots and Bags: Harvesting on the Balcony
Just because you don’t have a sprawling backyard doesn’t mean you have to miss out on the joys of homegrown potatoes. Container gardening and potato bags offer an ingenious solution for those with limited space, allowing you to cultivate a bountiful crop right on your balcony or patio.
Choose compact, early-maturing potato varieties well-suited to life in a pot or bag, and be sure to use a high-quality potting mix or soil blend enriched with compost. Planting depth, hilling, and mulching techniques are all the same as for in-ground gardens, just scaled down to fit your cozy growing space.
With a bit of creativity and a green thumb, you can enjoy the satisfaction of harvesting your own homegrown spuds, no matter the size of your outdoor oasis. So why not give it a try and see just how much you can grow in the confines of a container or bag?
FAQs: Mastering the Art of Potato Gardening
What is the optimal soil temperature for planting potatoes?
The ideal soil temperature for planting potatoes is around 10-12°C (50-54°F). Planting too early, when the soil is still cold and wet, can lead to rotting and poor growth.
How deep should I plant my potato seed tubers?
Plant potato seed tubers about 10-15 cm (4-6 inches) deep, spacing them 30-45 cm (12-18 inches) apart in the row. This depth allows for proper root development and gives the plants enough room to form a robust crop of tubers.
When should I start hilling up the soil around my potato plants?
Begin hilling soil up around the stems when the plants are about 20 cm (8 inches) tall, and continue to do so every 2-3 weeks as they grow. This protects the developing tubers from sunlight and encourages the formation of additional stems, each one bearing its own potatoes.
How can I tell when my potatoes are ready to harvest?
For early-season varieties, you can begin harvesting “new” potatoes when the plants are in full bloom, gently digging around the plants to find the small, tender tubers. For main-season and late-season potatoes, wait until the plants have flowered and the foliage begins to die back before digging up the entire crop.
- ➡Wasser dringt durch Nachbarwand in Ihr Haus „die Feuchtigkeit breitet sich aus“ wer verantwortlich ist und wer zahlen muss
- ➡Diese Lieblingsfarbe gilt laut Psychologen als Signal für hohe Intelligenz
- ➡Ex-Banker wird Bäcker: Mehlwürmer beenden sein Abfallproblem
- ➡Warum Pflanzenöl auf Möbeln zum heimlichen Allergie-Risiko werden kann
What’s the best way to store homegrown potatoes?
After harvesting, cure the potatoes in a cool, dry place for 10-14 days to thicken the skins. Then, store them in a dark, well-ventilated location like a root cellar or basement, where they can last for up to 6 months.
Can I grow potatoes in containers or bags?
Absolutely! Potato bags, buckets, and other containers are a great option for gardeners with limited space. Choose compact, early-maturing varieties and be sure to use a high-quality potting mix. Follow the same planting, hilling, and harvesting techniques as for in-ground gardens.
How can I prevent common potato pests and diseases?
Stay vigilant for signs of pests like Colorado potato beetles or diseases like late blight. Rotate your potato crops annually and keep the plants well-mulched to discourage problems. Organic pest controls and disease-resistant varieties can also help.
What’s the best way to add nutrients to my potato patch?
Potatoes thrive in nutrient-rich soil, so work plenty of compost or well-rotted manure into the planting area before sowing. You can also side-dress the plants with a balanced organic fertilizer as they grow. Avoid over-fertilizing, which can lead to lush foliage at the expense of tuber production.