For many gardeners, the dream of cultivating their own morel mushrooms remains just that – a dream. These elusive fungi, often called the “holy grail” of mushroom foraging, are notoriously difficult to grow at home. Their rarity, high price tag, and finicky growing requirements have deterred all but the most dedicated mushroom enthusiasts. But what if there was a way to turn your garden into a morel oasis?
Believe it or not, it is possible to grow morel mushrooms in your own backyard, with a little patience and the right conditions. While morels may seem like an impossible feat, a growing number of gardeners are discovering the secret to unlocking this culinary treasure trove right in their own backyards.
Why Morels Are Considered “Uncultivable”
Morel mushrooms are notoriously difficult to cultivate for several reasons. Unlike many other mushroom species, morels have a complex and symbiotic relationship with the soil and the trees around them. They rely on specific soil conditions, moisture levels, and even the chemical compounds released by decaying organic matter to thrive.
Additionally, morels require a delicate balance of temperature and humidity to fruit properly. This makes them challenging to replicate in a controlled, indoor setting. Many commercial attempts to cultivate morels have fallen short, leaving foragers to scour the forests for these prized fungi.
However, a growing number of gardeners have found a way to work with, rather than against, morels’ unique requirements. By creating a specialized “morel corner” in their backyard, they’ve been able to coax these elusive mushrooms to fruit year after year.
The Ideal Spot in the Garden for a “Morel Corner”
Morels thrive in areas with partial shade, slightly acidic soil, and a good amount of decaying organic matter. When choosing a spot in your garden, look for a location that receives dappled sunlight throughout the day, rather than full sun exposure.
The soil should be well-drilled and have a pH between 6.0 and 7.5. Morels tend to grow best in areas with a mix of hardwood trees, such as oak, ash, or maple, as they often form symbiotic relationships with the roots of these trees.
By carefully selecting the right spot in your garden, you can create the ideal conditions for morels to flourish. With a little preparation and ongoing maintenance, your very own “morel corner” can become a reality.
- ➡Warum Menschen ihr Wochenende lieber allein verbringen – und was das über ihre Persönlichkeit verrät
- ➡Endometriose und Ernährung: Was bei Gluten und Milch wirklich gilt
- ➡Zyklon Narelle rast auf Australien zu: Böen bis 260 km/h erwartet
- ➡Neue Trendfrisur ab 70: Warum der „Trixie Cut“ sofort jünger macht
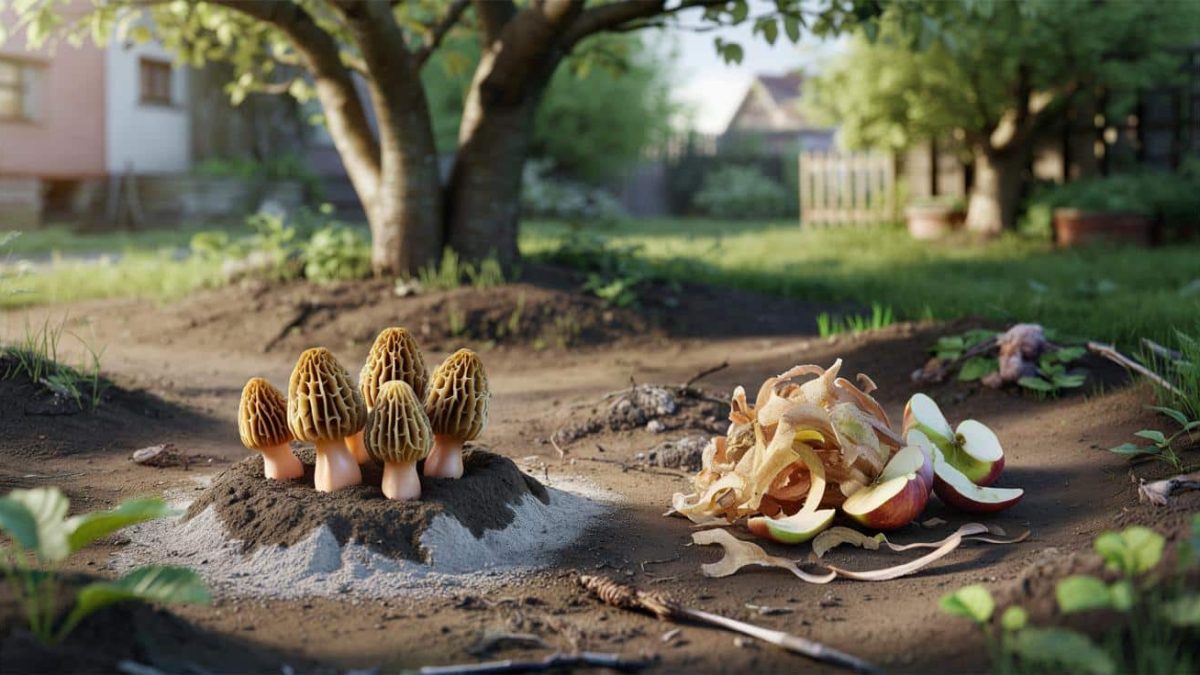
The Overlooked Key: Wood Ash and Apple Scraps
One of the key ingredients to creating a successful morel-growing environment in your garden is the addition of wood ash and apple scraps. These two often-overlooked materials can provide the perfect foundation for morels to thrive.
Wood ash is rich in potassium and other minerals that morels find beneficial. Sprinkling a thin layer of wood ash over your designated morel area can help balance the soil’s pH and provide essential nutrients. Similarly, apple scraps or other fruit waste can introduce the ideal level of acidity that morels prefer.
By combining these two simple ingredients, you’re creating a microclimate that closely mimics the natural habitat where morels thrive. This simple yet effective technique has helped many gardeners unlock the secret to growing their own morel mushrooms.
Step-by-Step Guide: Establishing Your Morel Patch
Ready to start your own morel-growing adventure? Here’s a step-by-step guide to setting up your very own morel patch in your garden:
- ➡Wenn der Spiegel zum Feind wird: Wie Körperschemastörung unser Selbstbild zerstört
- ➡Dieser kleine Gartenvogel kann deine Bienen vor Killerwespen schützen
- ➡Genialer Trick vom Floristen: So vertreiben Sie Trauermücken mit Streichhölzern
- ➡Schwarzäugige Susanne aussäen: Mit diesem einfachen Trick klappt’s immer
- Choose the perfect location: Select a shaded spot with well-drained, slightly acidic soil and a mix of hardwood trees.
- Prepare the soil: Till the soil to a depth of 6-8 inches, then spread a 2-inch layer of wood ash over the area. Mix in the ash thoroughly.
- Add organic matter: Spread a 2-inch layer of chopped apple scraps, leaf litter, or other decomposing organic matter over the wood ash-amended soil.
- Mulch the area: Cover the entire morel patch with a 2-3 inch layer of wood chips or shredded bark to help retain moisture and suppress weeds.
- Water regularly: Keep the soil consistently moist, but not waterlogged, during the growing season.
- Wait patiently: It can take 1-3 years for the morels to establish and begin fruiting. Resist the urge to dig or disturb the area.
By following these steps, you’re creating an environment that closely mimics the natural conditions morels thrive in. With a little time and care, your very own morel patch will begin to yield these prized fungi.
Why This System Works for Morels
The key to the success of this morel-growing method lies in the way it replicates the natural habitat and growing conditions of these elusive mushrooms. By providing the right balance of soil pH, organic matter, and moisture, you’re creating a microclimate that morels find irresistible.
The wood ash helps to balance the soil’s acidity, while the decomposing organic matter, such as apple scraps, introduces the ideal level of nutrients and acidity that morels crave. The mulch layer helps to retain moisture and suppress weed growth, further optimizing the conditions for morel growth.
Moreover, by leaving the area undisturbed and allowing the morels to establish themselves over time, you’re mimicking the natural processes that occur in the wild. This patient approach pays off in the long run, as the morels gradually spread and begin to fruit year after year.
Patience Is Key: When Will the First Morels Appear?
One of the biggest challenges with growing morels in your garden is the patience required. Unlike many other mushrooms, morels can take 1-3 years to establish themselves and begin fruiting. During this time, it’s essential to resist the urge to dig or disturb the area.
The first signs of success may be subtle, with small, immature morels peeking through the mulch. As the mycelium (the mushroom’s underground network) continues to spread and strengthen, the morel patches will gradually increase in size and yield over time.
While the wait can be frustrating, the payoff of harvesting your own homegrown morels makes it well worth the effort. With diligent care and a little bit of luck, your morel patch will eventually become a reliable source of these coveted fungi.
Maintaining the Morel Zone Throughout the Year
Keeping your morel patch healthy and productive requires some ongoing maintenance throughout the year. During the growing season, be sure to water the area regularly, ensuring the soil stays consistently moist but not waterlogged.
- ➡Laktoseintoleranz heilbar? Neue Hirn-Darm-Therapie macht Hoffnung
- ➡Wie Pferde unsere Angst riechen – und warum das im Sattel gefährlich wird
- ➡Diese drei Unternehmerfamilien zählen auch 2025 zu den 500 reichsten Deutschen und investieren stark in ihre Heimat
- ➡Geniale Winter-Trickmethode: Mit „Lasagne-Garten“ jetzt Traumbeete für den Frühling anlegen
In the fall, you can replenish the wood chip or bark mulch layer to a depth of 2-3 inches. This helps to insulate the soil and protect the mycelium during the winter months. Additionally, you can add a fresh layer of wood ash or apple scraps to the soil to further nourish the morels.
As spring arrives, be vigilant for the first signs of morel growth. Gently brush away any debris or weeds that may have encroached on the morel zone, taking care not to disturb the delicate mycelium. With a little seasonal care, your morel patch will continue to thrive and provide a bountiful harvest year after year.
Risks, Limitations, and Practical Considerations
While growing morels in your garden can be a rewarding endeavor, it’s important to be aware of the potential risks and limitations. Morels are sensitive to changes in their environment, and even small disturbances can disrupt their growth. Additionally, factors like weather, pests, and disease can all impact the success of your morel patch.
It’s also worth noting that the yield from a home-grown morel patch may be modest, especially in the early years. While you may be able to harvest a few pounds of these prized mushrooms, don’t expect to completely replace your need for foraging or purchasing morels from commercial sources.
- ➡Warum immer mehr Gemeinden verbieten, diese Hecke im Garten zu pflanzen
- ➡Meteoriten-Drama über Europa: Feuerball durchschlägt Hausdach in Deutschland
- ➡Nach Oster-Schock an der Kasse: Mutter verlässt ihren geizigen Mann
- ➡Ärzte warnen: Diese häufige Bewegung beim Aufheben von Gegenständen belastet den Rücken unnötig
Nevertheless, the joy of growing your own morels and incorporating them into your culinary creations can be immensely satisfying. With patience, diligence, and a bit of trial and error, you can create a thriving morel oasis right in your own backyard.
Maximizing the Bounty from Your Morel Bed
Once your morel patch is established and producing a reliable harvest, there are a few ways you can optimize your yields and get the most out of your homegrown mushrooms. Consider experimenting with different cultivation techniques, such as introducing new organic matter or adjusting the soil pH.
You can also explore ways to extend the morel season by planting a variety of morel species, each with slightly different growing requirements. This can help you enjoy a longer harvest period and a more diverse array of flavors.
Additionally, be mindful of harvesting methods that minimize disturbance to the mycelium. Gently brush away the mulch and carefully pick the mature morels, leaving the younger specimens to continue growing. With a bit of experimentation and care, you can maximize the bounty from your very own morel bed.
FAQs
Can I grow morels indoors?
While it is possible to grow morels in a controlled, indoor environment, it is extremely challenging and often not worth the effort for home gardeners. Morels thrive best in outdoor conditions that closely mimic their natural habitat.
How long does it take for morels to establish in a garden?
Patience is key when growing morels. It can take 1-3 years for the morels to fully establish and begin fruiting in a home garden setting. During this time, it’s important to leave the area undisturbed and maintain the ideal conditions.
What type of soil is best for growing morels?
Morels prefer slightly acidic, well-drained soil with a mix of decomposing organic matter. Adding wood ash and apple scraps can help create the ideal soil conditions for morels to thrive.
How much can I expect to harvest from a home morel patch?
The yield from a home-grown morel patch can vary, but in general, you can expect to harvest a few pounds of morels per season once the patch is well-established. The harvest may start small and gradually increase over time.
Do morels need full sun or shade?
Morels prefer partial shade, with dappled sunlight throughout the day. Avoid areas with full, direct sunlight, as this can be too harsh for these delicate mushrooms.
How do I know when to harvest the morels?
Look for the distinctive, sponge-like caps of the morels peeking through the mulch. Harvest the mature morels by gently twisting and pulling them from the soil, taking care not to disturb the surrounding mycelium.
Can I transplant morels from the wild to my garden?
Transplanting wild morels is generally not recommended, as the process can be very disruptive to the delicate mycelium and often results in the morels failing to thrive in the new environment.
How do I store and preserve my homegrown morels?
Freshly harvested morels can be stored in the refrigerator for up to a week. For longer-term storage, you can dry the morels or freeze them. Dried morels can be rehydrated and used in a variety of dishes, while frozen morels are perfect for sautéing or incorporating into sauces and soups.