As the winter chill gives way to the gentle warmth of spring, many gardeners eagerly await the revival of their beloved oleander plants. However, the transition from the dormant winter months can often leave these tropical beauties looking rather worse for wear, with brown leaves, bare branches, and seemingly lifeless pots. But fear not – with the right care and attention, your oleander can bounce back and blossom into a stunning floral display once again.
The journey to reviving an oleander after winter may seem daunting, but with a step-by-step plan, you can bring this resilient plant back to its former glory. Whether you’re a seasoned green thumb or a novice gardener, this guide will walk you through the essential steps to nurse your oleander back to health and transform it into a vibrant, blooming centerpiece for your outdoor space.
Assessing the Damage: Is Your Oleander Salvageable?
The first step in resuscitating your oleander is to determine the extent of the damage. Don’t be too quick to write off the plant just yet – even if it appears lifeless, there may still be hope. Carefully inspect the stems, roots, and any remaining foliage for signs of life. Look for any green, flexible growth, as this indicates that the plant is still actively growing and has the potential to bounce back.
If the majority of the plant appears to be brown and brittle, don’t despair. Oleanders are known for their resilience and ability to recover from even the harshest of conditions. With the right care and attention, you can coax your oleander back to health and witness its glorious bloom once again.
- ➡Geheime Chronik der Meere: Was Schildkrötenpanzer wirklich verraten
- ➡Pestizid-Schock 2026: Dieser beliebte Fruchtklassiker ist am stärksten belastet
- ➡Seit 15 Jahren verschwunden: Michael Jordans legendäre Ferrari taucht wieder auf
- ➡Winzlinge im Härtetest: Was Bärtierchen auf Mars-Boden wirklich aushalten
Remember, patience and a gentle touch will be key as you navigate the process of reviving your oleander. Rushing the recovery process or being too aggressive with pruning can further stress the plant and hinder its ability to bounce back.
Easing the Transition: Introducing Your Oleander to the Outdoors
Once you’ve determined that your oleander is worth saving, the next step is to gradually reintroduce it to the great outdoors. Sudden changes in temperature and light exposure can be traumatic for a plant that has been sheltered indoors during the winter months. To avoid shocking your oleander, start by placing it in a sheltered, shaded area for a few days, gradually increasing its exposure to sunlight over the course of a week or two.
This gradual acclimation process will help your oleander adjust to the new environmental conditions and minimize the risk of stress or damage. Pay close attention to any signs of distress, such as wilting or discoloration, and be prepared to move the plant back into a more protected area if necessary.
By taking the time to ease your oleander back into its outdoor home, you’ll be setting the stage for a successful recovery and the stunning display of blooms to come.
- ➡Wohntrends 2025: So holst du dir mit SHEIN japandi-Harmonie nach Hause
- ➡15-Stunden-Ritual: So wird dein Frühjahrsputz zum Neustart für Zuhause
- ➡Sommerzeit-Umstellung: Mit diesen Arzt-Tipps kommen Sie gut durch die verlorene Stunde
- ➡Neues „Zucker-Gel“ lässt Haare wachsen – im Test sogar so schnell wie Rogaine
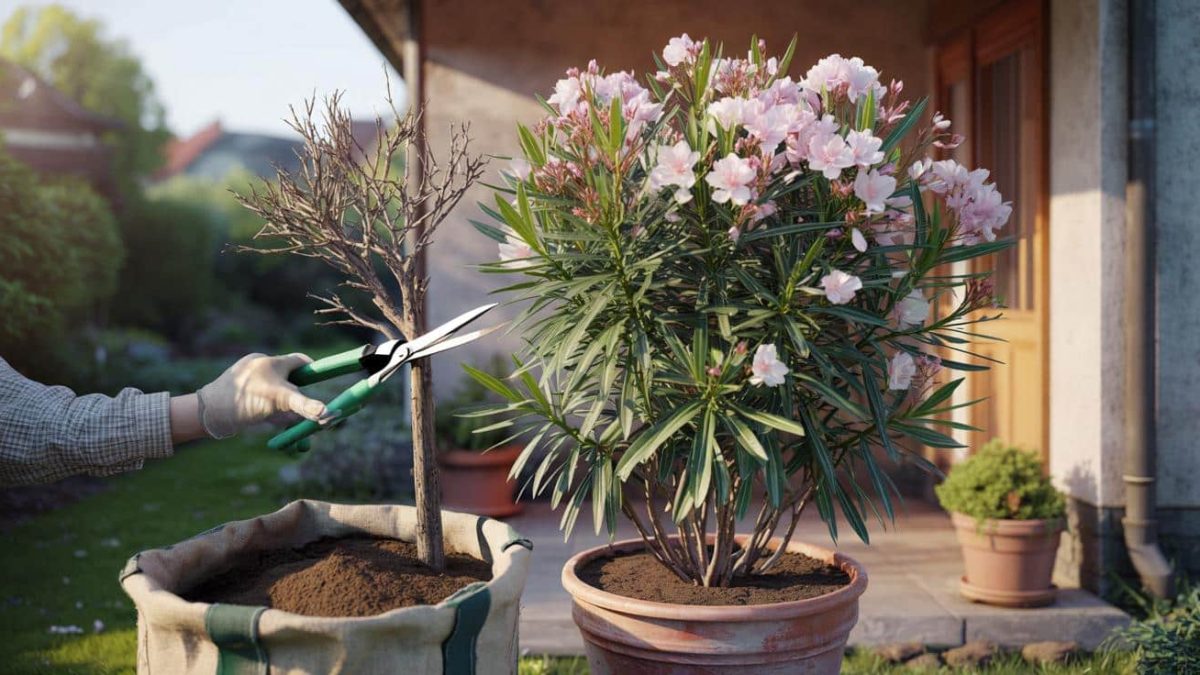
Pruning for a Fresh Start: Giving Your Oleander a Haircut
Once your oleander has settled into its new outdoor environment, it’s time to tackle the task of pruning. This step is crucial for encouraging new growth and rejuvenating the plant’s appearance. Begin by carefully removing any dead or severely damaged branches, cutting them back to the nearest healthy node or stem.
When it comes to pruning, it’s important to strike a balance between being too aggressive and not cutting back enough. Aim to remove about a third of the plant’s overall foliage, focusing on the areas that appear the most lifeless or overgrown. This strategic trimming will stimulate the plant to direct its energy into new, healthy growth, setting the stage for a stunning floral display in the months to come.
Remember, the goal is not to create a perfectly manicured shape, but rather to provide your oleander with the opportunity to regenerate and thrive. Trust the plant’s natural resilience, and let the pruning process be a gentle, guiding hand rather than a heavy-handed chop.
Revitalizing the Roots: Repotting and Refreshing Your Oleander’s Home
Once you’ve addressed the above-ground issues, it’s time to turn your attention to the root system. Oleanders are heavy feeders, and over time, the soil in their pots can become depleted of essential nutrients. Repotting your oleander into fresh, nutrient-rich potting soil can provide a much-needed boost to the plant’s overall health and vigor.
- ➡Schmerzfrei ins Lauf-Frühjahr: Diese 10-Prozent-Regel schützt deine Knie
- ➡Geheimes Zeichen auf zwei Rädern: Warum Biker plötzlich das Bein rausstrecken
- ➡Japanischer 60-Sekunden-Trick: So wurde meine Chaoswohnung in einer Woche ruhig
- ➡Dieser orangeblühende Mini-Strauch macht selbst den kleinsten Garten groß
When repotting, be sure to gently loosen the root ball and inspect it for any signs of damage or disease. If the roots appear healthy, you can simply transfer the plant to a slightly larger container. However, if the roots are overly compacted or showing signs of rot, it’s best to prune them back before replanting.
Remember to choose a pot with ample drainage holes to prevent waterlogging, and consider adding a layer of gravel or perlite to the bottom of the container to further improve drainage. By providing your oleander with a fresh, well-draining home, you’ll be setting the stage for a season of vibrant growth and abundant blooms.
Nourishing the Revival: Feeding and Watering Your Oleander
With the structural foundation in place, it’s time to focus on the ongoing care and nourishment of your oleander. These plants are heavy feeders, requiring a steady supply of nutrients to fuel their growth and flower production.
Begin by applying a balanced, slow-release fertilizer to the soil, following the manufacturer’s instructions closely. This will provide a steady, sustained release of essential nutrients to support the plant’s recovery and future development. Additionally, be sure to keep the soil consistently moist, but not waterlogged, throughout the growing season.
As your oleander begins to bounce back and produce new growth, you may need to adjust your watering and feeding regimen accordingly. Keep a close eye on the plant’s progress and be prepared to increase or decrease the frequency and amount of water and fertilizer as needed.
Optimizing Conditions: Ensuring Your Oleander Thrives
While the steps outlined above will go a long way in reviving your oleander, there are a few additional factors to consider for ensuring its long-term success. Oleanders are sun-loving plants, so be sure to place them in a location that receives at least six hours of direct sunlight each day. Additionally, these tropical beauties prefer well-draining soil, so amending your potting mix with sand or perlite can help prevent waterlogging and root rot.
It’s also important to be mindful of the potential for pests and diseases. Regularly inspect your oleander for any signs of infestation or fungal issues, and be prepared to take swift action with appropriate, organic treatments if necessary. By staying vigilant and addressing any problems early on, you can help your oleander thrive and continue to grace your outdoor space with its stunning blooms.
With patience, care, and the right combination of pruning, repotting, feeding, and sunlight, your once-bedraggled oleander can be transformed into a lush, vibrant centerpiece that will delight you for seasons to come.
Tracking the Comeback: Signs of a Healthy, Recovering Oleander
As you embark on the journey of reviving your oleander, it’s important to keep a close eye on the plant’s progress. Look for key indicators that your efforts are paying off, such as the emergence of new growth, the development of healthy, green leaves, and the gradual filling out of the plant’s overall appearance.
Additionally, pay attention to the timing and abundance of the oleander’s bloom cycle. A thriving, well-cared-for plant will typically produce a profusion of fragrant flowers throughout the growing season, often starting as early as late spring or early summer. If your oleander begins to exhibit this vibrant display, you’ll know that your hard work has paid off.
Remember, the recovery process may take time, so be patient and continue to provide your oleander with the care and attention it needs. With diligence and a bit of green-thumbed know-how, you’ll soon be rewarded with a lush, blooming oleander that will be the envy of your neighborhood.
Embracing the Oleander’s Resilience: A Gardener’s Triumph
The journey of reviving an oleander after the winter months is a testament to the resilience and adaptability of these incredible plants. While the process may seem daunting at first, with the right approach and a little bit of TLC, you can transform a seemingly lifeless specimen into a vibrant, blooming centerpiece that will delight you for years to come.
- ➡Warum Japaner im Winter keine Vögel füttern – und was wir davon lernen können
- ➡Genialer Garten-Hack: Mit Eierkartons immer perfekten Knoblauch-Abstand setzen
- ➡Psychologie: 8 versteckte Stärken, wenn du lieber allein bist
- ➡Vergiss den Trenchcoat: Diese 30‑Euro-Regenjacke von Decathlon rockt den Frühling
As you embark on this revitalization journey, take a moment to appreciate the sheer tenacity of the oleander. These tropical beauties have the remarkable ability to bounce back from even the harshest of conditions, reminding us all that with the right care and attention, even the most challenging of plants can be coaxed back to life.
Embrace the challenge, trust the plant’s natural resilience, and savor the triumph of witnessing your oleander’s stunning comeback. It’s a journey that not only rewards you with a beautiful, blooming plant but also a deeper appreciation for the wonders of the natural world.
| Oleander Care Checklist | Timeline |
|---|---|
| Assess plant health and salvageability | Early spring |
| Gradually introduce plant to outdoor conditions | 1-2 weeks |
| Prune and shape the plant | Early spring |
| Repot and refresh the root system | Early spring |
| Fertilize and water regularly | Throughout growing season |
| Monitor for pests and diseases | Ongoing |
| Observe signs of recovery and blooming | Late spring/early summer |
“Oleanders are truly remarkable plants – their ability to bounce back from even the harshest conditions is truly inspiring. With the right care and attention, you can transform a seemingly lifeless specimen into a vibrant, blooming centerpiece that will delight for years to come.”
Also Read
- ➡Astrologie enthüllt: Der 29. März 2026 bringt eine emotionale Explosion für diese Zeichen
- ➡Nackenschmerzen nach dem Aufwachen? Diese einfachen Tricks helfen wirklich
- ➡Diese 4 Hunderassen kommen erstaunlich gut mit Kaninchen klar
- ➡Hochbegabte Schüler hassen diese Situation im Unterricht – Experten warnen
– Sarah Thompson, Horticulture Specialist
“The key to reviving an oleander after winter is patience and a gentle touch. Rush the process or be too aggressive with pruning, and you risk further stressing the plant. Take it slow, observe closely, and trust in the plant’s natural resilience – that’s the secret to a successful comeback.”
– Emma Greenfield, Master Gardener
“Oleanders are heavy feeders, so providing them with the right nutrients is crucial for a strong recovery. Be sure to use a balanced, slow-release fertilizer and keep the soil consistently moist but not waterlogged. With the right care, you’ll be rewarded with a stunning display of fragrant blooms.”
Also Read– Dr. Liam Barker, Plant Biologist
How can I tell if my oleander is still alive?
Look for any signs of green, flexible growth on the stems and branches. Even if the leaves appear brown and lifeless, the presence of new growth indicates that the plant is still viable and has the potential to recover.
When is the best time to prune my oleander?
The best time to prune your oleander is in early spring, before new growth begins to emerge. This will give the plant a chance to focus its energy on regenerating and producing a lush, vibrant display of blooms.
How often should I fertilize my oleander?
Oleanders are heavy feeders, so they benefit from regular fertilization throughout the growing season. Apply a balanced, slow-release fertilizer every 4-6 weeks, following the manufacturer’s instructions closely.
- ➡Rätselhafte Radiobake im All: Neues Objekt gibt Forschern Rätsel auf
- ➡Influencer verpasst Schuhspende ein AirTag – und bringt das Rote Kreuz in Erklärungsnot
- ➡Winziger Faser-Sensor spürt Krebs auf, bevor er sich ausbreitet
- ➡Letzte Minuten mit Hund oder Katze: Diese Worte trösten – und einen Satz sollten Sie vermeiden
What type of soil is best for an oleander?
Oleanders prefer well-draining, nutrient-rich soil. A potting mix specifically formulated for container plants or a blend of compost, sand, and perlite can provide the ideal growing medium for your oleander.
How much sun does an oleander need?
Oleanders are sun-loving plants, requiring at least 6 hours of direct sunlight per day. Choose a location that receives plenty of bright, unobstructed light to ensure your oleander thrives.
Can I move my oleander outdoors after winter?
Yes, you can move your oleander outdoors after the winter, but be sure to introduce it to the new environment gradually. Start by placing it in a shaded, sheltered area and slowly increase its exposure to sunlight over the course of a week or two.
How do I know when my oleander is ready to bloom?
As your oleander recovers and regains its vigor, you’ll start to see new growth and the development of flower buds. Once the plant is producing a healthy, full canopy of leaves, it’s a good sign that it’s ready to put on a stunning floral display.
What are the common pests and diseases that affect oleanders?
Oleanders can be susceptible to a variety of pests, including aphids, mealybugs, and scale insects. They may also develop fungal issues like root rot if the soil stays too wet. Regularly inspecting your plant and taking swift action with organic treatments can help keep these problems at bay.