Orchids have long been cherished for their stunning blooms, but many plant owners struggle to keep these delicate flowers thriving after their initial bloom. However, a simple trick from the baking aisle may be the secret to reviving your orchids and coaxing out those magnificent flowers once again.
Surprisingly, the key ingredient lies in a common pantry staple: molasses. This unassuming baking ingredient is packed with essential nutrients that can provide a much-needed boost for your orchids, helping them to regain their vibrant display of petals.
Whether you’re tending to a prized Phalaenopsis or experimenting with other orchid varieties, this molasses-based solution could be the game-changer you’ve been searching for. Get ready to witness the remarkable resurgence of your orchid blooms.
The Surprising Benefits of Molasses for Orchids
Orchids are notoriously finicky plants, often requiring specialized care and attention to maintain their lush foliage and spectacular flowers. After the initial bloom, many orchid owners are left scratching their heads, wondering why their plants seem to lose their vigor and refuse to flower again.
The secret lies in the unique nutritional profile of molasses. This dark, syrupy substance is rich in essential minerals and trace elements that orchids crave, including magnesium, iron, and zinc. By incorporating molasses into your orchid’s feeding regimen, you’re providing a concentrated boost of the very nutrients these plants need to thrive.
Moreover, molasses acts as a natural soil conditioner, helping to improve the overall structure and drainage of the potting mix. This is particularly beneficial for orchids, which prefer well-aerated, slightly acidic growing mediums. By enhancing the soil quality, you’re setting the stage for robust root development and optimal nutrient uptake.
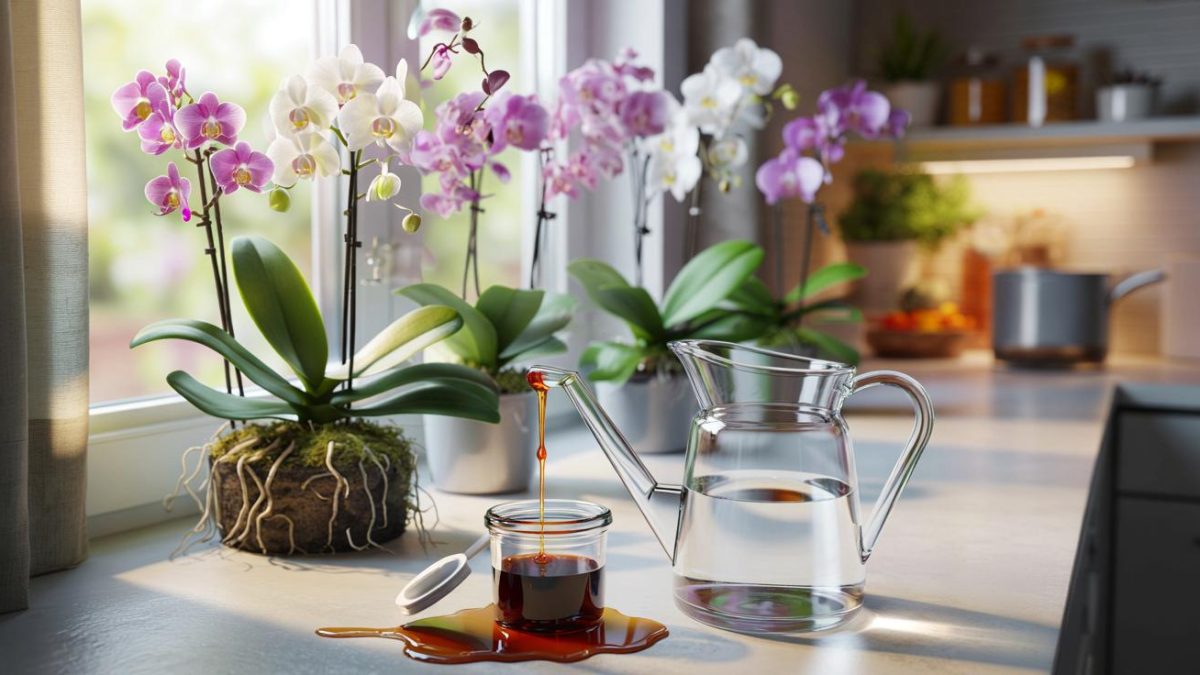
Mixing the Perfect Molasses-Based Orchid Fertilizer
Creating your own molasses-infused orchid fertilizer is a straightforward process that can be tailored to suit your plant’s needs. Begin by mixing equal parts of molasses and water in a spray bottle or watering can. The concentration can be adjusted based on the size and vigor of your orchid, with more mature or struggling plants benefiting from a slightly stronger solution.
When applying the molasses mixture, be sure to saturate the potting medium thoroughly, ensuring that the roots have access to the nutrient-rich solution. Depending on the size of your orchid, you may need to apply the mixture every two to four weeks, keeping a close eye on the plant’s response and adjusting the frequency as needed.
It’s important to note that while molasses can work wonders for orchids, it’s not a one-size-fits-all solution. Factors such as the orchid variety, growing conditions, and overall plant health should all be taken into consideration when determining the appropriate application schedule.
Avoiding Common Molasses Mishaps
While molasses can be a game-changer for reviving your orchids, it’s important to use it with caution. Overuse or improper application can lead to issues such as root rot, fungal infections, and even salt buildup in the potting medium.
To ensure the best results, always dilute the molasses thoroughly and avoid applying it directly to the plant’s leaves or flowers. Additionally, be mindful of the orchid’s watering needs, as the molasses-enriched soil may retain moisture more effectively, potentially leading to waterlogged conditions if not monitored closely.
Another potential pitfall to watch out for is the risk of attracting unwanted pests, such as ants or fruit flies, that may be drawn to the sugary molasses solution. To mitigate this, consider applying the mixture during the cooler hours of the day and ensuring proper drainage to discourage these unwelcome visitors.
- ➡Aus Omas Leinenlaken werden 2026 begehrte Luxus-Unikate
- ➡Diese 10 Turbo-Stauden lassen deinen Garten in einem Sommer explodieren
- ➡Alzheimer-Risiko drastisch senken: Studie nennt drei Schlüssellebensmittel
- ➡Blutige Geheimnisse aus der Felsensiedlung: Forscher entschlüsseln mittelalterliches Höhlendorf in Spanien
Complementary Ingredients for Orchid Care
While molasses serves as the star ingredient in this orchid-reviving trick, it’s not the only kitchen staple that can benefit these plants. Other common household items, such as banana peels and used coffee grounds, can also provide a welcome boost to your orchid’s health and vitality.
Banana peels, for instance, are rich in potassium, a crucial mineral for promoting strong root development and encouraging the production of new flower spikes. Simply chop or blend the peels and work them into the potting medium around your orchid’s roots.
Similarly, coffee grounds can help to acidify the soil, creating the ideal pH range for many orchid varieties. Just be sure to apply the grounds sparingly and mix them thoroughly to avoid any potential issues with compaction or drainage.
Timing is Everything: When to Apply the Molasses Trick
While the molasses-based solution can work wonders for reviving your orchids, it’s important to time the application correctly. The best time to introduce this nutrient boost is typically in the spring or early summer, when the plant is actively growing and preparing to set new flower buds.
Applying the molasses mixture during the fall or winter months, when orchids are naturally in a state of dormancy, may not yield the same dramatic results. In fact, it could even lead to issues such as root rot or fungal growth if the potting medium remains too moist during the cooler, less active growth period.
By aligning the molasses treatment with the orchid’s natural growth cycle, you’re providing a targeted and effective boost that can help to stimulate the plant’s flowering response and ensure a vibrant, long-lasting display of blooms.
Sustainable Orchid Care: Building a Healthy Foundation
While the molasses trick can be a powerful tool for reviving your orchids, it’s important to remember that it’s just one piece of the puzzle when it comes to long-term, sustainable orchid care. Proper potting, watering, and environmental conditions are all crucial factors that will contribute to the overall health and resilience of your plants.
By investing in high-quality potting media, providing the right amount of light and humidity, and monitoring your orchid’s water needs, you’re laying the groundwork for a thriving, long-lasting relationship with these captivating flowers. And when the time is right, the molasses-based solution can be the secret weapon that coaxes out those breathtaking blooms time and time again.
So, if you’re ready to witness the remarkable resurgence of your orchids, don’t hesitate to give this baking aisle-inspired trick a try. With a little bit of patience and the right nurturing approach, you’ll be rewarded with a stunning display of orchid elegance that will delight and inspire for years to come.
FAQ
How much molasses should I use for my orchids?
The ideal molasses concentration can vary depending on the size and needs of your orchid. As a general guideline, mix equal parts molasses and water in a spray bottle or watering can, and adjust the ratio as needed based on your plant’s response.
Can I use any type of molasses for my orchids?
Yes, you can use a variety of molasses types, including blackstrap molasses, unsulfured molasses, or even a mix of different molasses. The key is to ensure the molasses is diluted properly to avoid any potential issues with salt buildup or root damage.
How often should I apply the molasses mixture?
Typically, you’ll want to apply the molasses solution every 2-4 weeks during the growing season (spring and summer). Adjust the frequency based on your orchid’s response and overall health.
Will the molasses attract pests to my orchids?
While the sweet aroma of molasses can potentially attract some unwanted guests, such as ants or fruit flies, you can minimize this risk by applying the mixture during the cooler hours of the day and ensuring proper drainage to discourage these pests.
Can I use molasses on all types of orchids?
Yes, the molasses trick can be beneficial for a wide range of orchid varieties, including Phalaenopsis, Dendrobium, Cattleya, and more. However, it’s always a good idea to research the specific care requirements for your orchid type to ensure the best results.
Will the molasses affect the pH of my orchid’s soil?
Yes, the addition of molasses can help to slightly acidify the soil, which is ideal for many orchid varieties. However, be mindful of the overall pH range and consider supplementing with other ingredients, like coffee grounds, to maintain the optimal growing conditions for your orchid.
Can I use molasses in combination with other orchid care techniques?
Absolutely! The molasses trick can be used in conjunction with other proven orchid care methods, such as proper potting, watering, and the incorporation of additional nutrient-rich ingredients like banana peels or eggshells. This holistic approach can help to create a well-rounded, thriving environment for your orchids.
- ➡Marathon unter 4 Stunden: Der 12-Wochen-Trainingsplan, den Hobbysportler ab 40 tatsächlich durchhalten und der funktioniert
- ➡Dichter Rasen im März: Mit 3 einfachen Schritten Moos loswerden
- ➡Nachdem ich das Kleingedruckte las, landeten meine Light-Joghurts im Müll
- ➡Frau testet Nivea gegen Luxuscreme für 490 Euro – das verblüffende Falten-Ergebnis
How long does it take to see results from the molasses treatment?
The timeline for seeing results can vary depending on the overall health and vigor of your orchid, as well as the consistency of the molasses application. In general, you may start to notice new growth and the emergence of flower buds within 4-8 weeks of regular molasses treatments.