As the spring season approaches, many gardeners eagerly await the chance to bring their beloved plants to life. However, the delicate process of transplanting seedlings and young plants can often lead to a frustrating setback, as the vibrant greenery can quickly wilt and struggle to adapt to its new environment. But fear not, for there is a genius gardening trick that can help you overcome this hurdle and ensure a seamless transition for your precious plants.
Imagine a verdant garden or a lush balcony bursting with thriving, healthy plants. This vision is not just a dream, but a reality that can be achieved with a simple yet effective technique. By understanding the unique needs of young plants and taking a few strategic steps, you can successfully transplant them without the dreaded growth stagnation that often occurs.
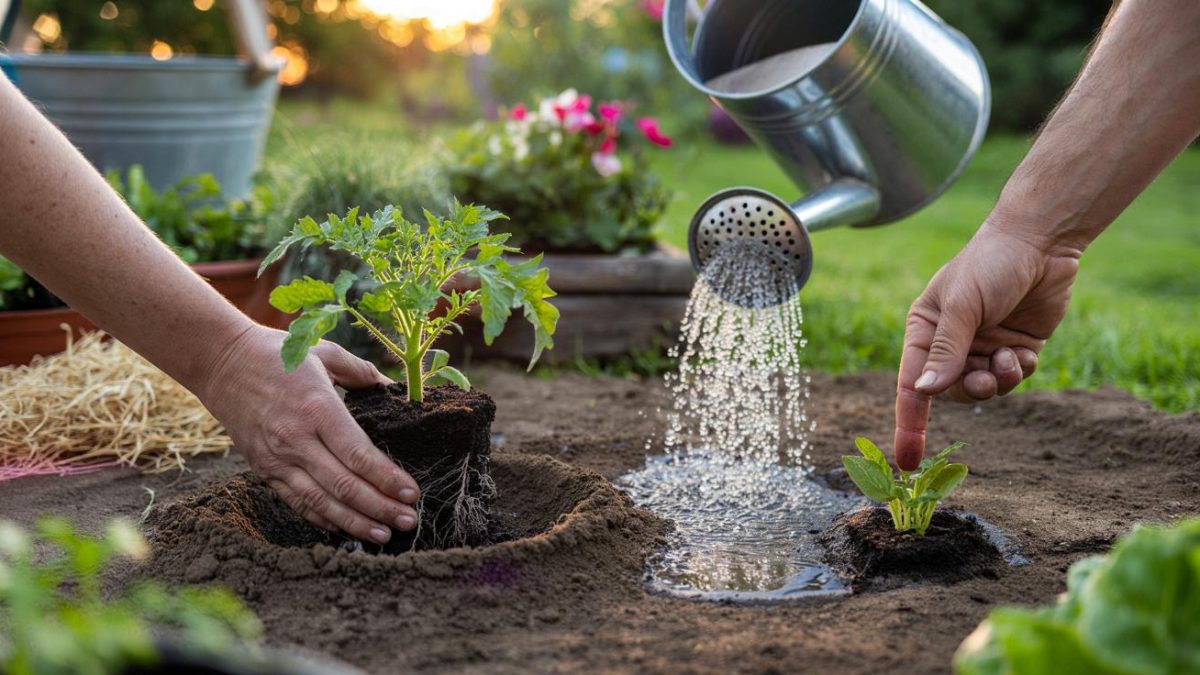
The Magical 10-Liter Rule: Hydration for a Smooth Transition
One of the key factors in ensuring a successful plant transplant is proper hydration. The old adage “water is life” holds true, especially when it comes to relocating young seedlings. The magic number to keep in mind is 10 liters of water per square meter of planting area.
Before you even begin the transplanting process, make sure to thoroughly soak the soil where your plants will be placed. This pre-watering creates a moist, inviting environment that will welcome the newcomers and reduce the risk of shock. By providing this hydration boost, you’re setting your plants up for a smooth transition, allowing their roots to quickly establish themselves in the new location.
But the watering doesn’t stop there. After carefully transplanting your seedlings, be sure to give them a gentle yet generous soaking. This immediate hydration will help minimize wilting and keep your plants thriving, even during the initial adjustment period.
Intentional Dry Spells: Letting the Roots Do the Work
While it may seem counterintuitive, intentionally allowing your plants to experience brief dry spells can actually benefit their long-term growth and resilience. This strategic approach encourages the roots to explore and expand, seeking out the necessary moisture and nutrients in the soil.
By introducing controlled drying periods, you’re essentially challenging your plants to work harder and become more self-sufficient. This “root training” helps them develop a stronger, more extensive root system that can better withstand environmental stresses and access the resources they need to thrive.
Of course, it’s important to find the right balance. You don’t want to subject your plants to prolonged drought, but rather allow for brief, carefully monitored dry spells. This delicate dance between watering and drying will ultimately result in healthier, more resilient plants that are better equipped to handle the rigors of their new environment.
- ➡Alte Holz-Schneidebretter retten: Mit diesem simplen Trick wirken sie wieder fast neu
- ➡Schlafapnoe erstmals per Tablette behandelbar: Studie zeigt 47 Prozent weniger Atemaussetzer
- ➡Diese unsichtbare Veränderung im Regen erhöht das Hochwasserrisiko dramatisch
- ➡Stauden richtig erkennen: So finden Hobbygärtner dauerhafte Pflanzenstars
The Three-Step Protection Shield: Shielding Against Transplant Shock
Transplant shock is a common concern for gardeners, as young plants can often struggle to adapt to their new surroundings. However, with a three-step protection plan, you can effectively shield your plants and ensure a seamless transition.
The first step involves providing shade or partial coverage for your newly transplanted seedlings. This simple measure helps to reduce the intensity of direct sunlight, which can be overwhelming for delicate plants. By creating a shaded area, you’re allowing them to gradually acclimate to their new environment without the added stress of harsh sun exposure.
The second step is to ensure adequate soil moisture, as we’ve already discussed. By keeping the soil consistently moist, you’re providing the necessary hydration for the roots to establish themselves and minimize the risk of wilting or stunted growth.
Finally, the third step is to apply a layer of organic mulch around the base of the plants. This protective barrier helps to retain soil moisture, regulate temperature, and suppress weed growth, all of which contribute to the overall health and well-being of your transplanted seedlings.
Balcony and Raised Bed Specifics: Tailoring the Technique
While the principles of successful plant transplanting remain the same, there are some nuances to consider when working with specific growing environments, such as balconies and raised beds.
On balconies, where space is often limited, it’s crucial to choose compact, space-saving plant varieties that will thrive in their new container homes. Additionally, the exposure to wind and fluctuating temperatures on a balcony may require extra attention to shading and moisture management.
In raised beds, the soil depth and composition can play a significant role in the success of your transplants. Ensure that the growing medium is nutrient-rich and well-draining, allowing the roots to establish themselves without becoming waterlogged or struggling to access essential nutrients.
By tailoring your approach to the specific needs of your growing environment, you can maximize the chances of a thriving, vibrant garden or balcony oasis, even with the delicate task of transplanting young plants.
The Beneficiaries: Which Plants Thrive with This Technique?
While the genius gardening trick we’ve discussed can be applied to a wide range of plants, some species are particularly well-suited to benefit from this approach.
Leafy greens, such as lettuce, spinach, and kale, often respond incredibly well to the transplanting method outlined here. These fast-growing plants can quickly bounce back from the initial shock and continue to flourish in their new homes.
Tomatoes, peppers, and eggplants are also excellent candidates, as they tend to be more sensitive to transplanting and can easily experience growth stagnation if not properly cared for. By following the steps outlined, you can ensure these prized vegetables maintain their vigor and productivity.
Additionally, many annual flowers, like marigolds, zinnias, and cosmos, thrive when transplanted using this technique. These vibrant blooms will add a splash of color to your garden or balcony, and the strategic approach will help them establish themselves quickly.
The Long-Term Payoff: Why This “Millimeter Strategy” Matters
While the initial investment of time and attention may seem daunting, the long-term benefits of this “millimeter strategy” for plant transplanting are truly remarkable. By taking these extra steps, you’re not only ensuring the immediate success of your young plants but also setting the stage for their continued growth and resilience.
The strengthened root systems, enhanced resilience, and optimal growing conditions created by this approach will translate into healthier, more abundant harvests and vibrant displays of color throughout the growing season. Your plants will be better equipped to withstand environmental stresses, pests, and diseases, ultimately requiring less maintenance and providing you with a bountiful, thriving garden or balcony oasis.
In the end, the time and effort invested in this genius gardening trick will pay dividends in the form of a lush, flourishing outdoor space that brings joy, beauty, and a connection to nature right to your doorstep. So, embrace this “millimeter strategy” and watch your plants thrive as they transition into their new homes.
FAQ
How much water do I need to soak the soil before transplanting?
The magic number is 10 liters of water per square meter of planting area. This pre-watering creates a moist, inviting environment for your young plants.
- ➡Mit 72 Jahren Radfahren auf flachen Strecken: Wie moderate Bewegung die Fitness unterstützt
- ➡Gefunden: So handeln Sie richtig, wenn ein Hund keinen Chip hat
- ➡Dermatologin warnt: So oft müssen Sie Sportkleidung wirklich waschen
- ➡Chanel-Show in Paris: Inès de la Fressange macht die weiße Hose wieder heiß
How often should I water my newly transplanted plants?
After transplanting, make sure to give your plants a generous, gentle soaking. Then, allow for brief, controlled dry spells to encourage root development, but don’t let them become completely dehydrated.
What type of shade should I provide for my transplanted plants?
You can use a variety of materials to create partial shade, such as garden umbrellas, shade cloths, or even strategically placed objects that block direct sunlight.
How do I choose the right mulch for my transplanted plants?
Opt for organic mulches, such as wood chips, straw, or leaves, as they help retain soil moisture and suppress weed growth around the base of your plants.
What are some good plant varieties for balconies and raised beds?
For balconies, choose compact, space-saving plants like cherry tomatoes, dwarf beans, and trailing flowers. For raised beds, focus on leafy greens, herbs, and shallow-rooted vegetables that thrive in well-drained, nutrient-rich soil.
How long does it take for transplanted plants to fully recover?
With the proper care and techniques, most plants will recover and start thriving within 2-3 weeks after transplanting. Be patient and continue to monitor their progress during this adjustment period.
Can I transplant plants during the summer heat?
It’s generally best to avoid transplanting during the hottest months of summer, as the plants may struggle to adapt. Focus on transplanting in the spring or fall when temperatures are more moderate.
How can I tell if my transplanted plants are stressed?
Signs of stress include wilting, discolored leaves, and slow or stunted growth. If you notice these symptoms, increase watering and provide additional shade or protection as needed.